The hardware to mount or wire a LEDress display is an option on the order form. For a printable installation instruction sheet, click here.
Save a trip to the store and order a mounting kit containing 2 straight braces, 2 angle braces, and 4 screws.
Hardware items included in the
mounting or wiring kits
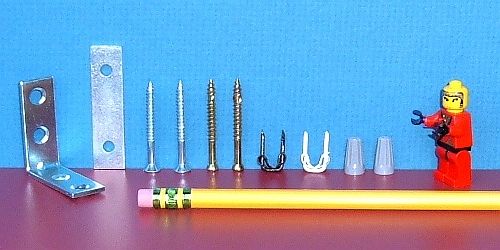
Various commonly available hardware for wiring and mounting is pictured, left to right:
- Right-angle brace 1.5"
- Straight brace or mending plate 2"
- Phillips screws
- Screws with narrow head for hanging units
- Brown insulated staple
- White insulated staple
- Wire nuts
- Robot helper and pencil not included
Both brace types are zinc plated and rust-resistant. In certain climates or where water can puddle on the braces, rust may occur. Those customers may want to buy their own stainless steel hardware, or paint the pieces that come in the LEDress kit before installing the display.
A) Overhead mounted; B) Wall mounted
C) Wall hung; D) Attach both ends of the enclosure
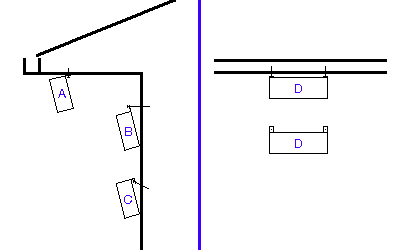
The simplest method of mounting to a house is to use the LEDress enclosure's own screws to attach commonly available hardware to it and then to the house. This avoids drilling extra holes into the enclosure. If doing this, just do one corner screw at a time; removing both top or bottom screws will cause the digits to pop out of their slots.
Three basic ways of mounting are:
- Soffit, or overhead-mounted
- Siding, or wall-mounted
- Siding, or wall-hung
The pictures and sketch show examples of all three. These methods are suggestions; if another method is used, take care to avoid drilling or screwing into the electronics inside. The plastic enclosure is easy to drill and screws will readily thread into holes of the proper size.
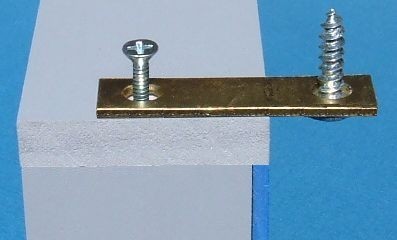
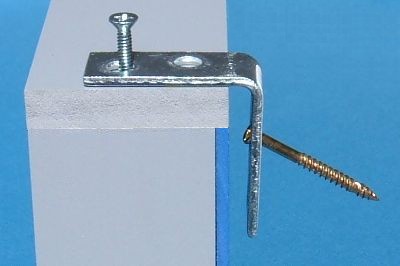
Setup for overhead mounting.
The enclosure screws are re-used.
Although the LEDress enclosure is made of materials intended for outdoor use, as with any plastic item, it will stay better-looking if given some protection under a gutter, eave, or porch.
A black plastic unit should not be placed in hot direct sun without some way of being shaded from above.
Exposure to rain and snow is fine; caulk/seal any holes made for mounting or wiring. Some insects can get in more easily than rain through tiny openings.
On existing homes, the unit is typically placed above the garage door. This allows the shortest wiring run to a garage electrical outlet, where wires are less of a bother than they are inside the house.
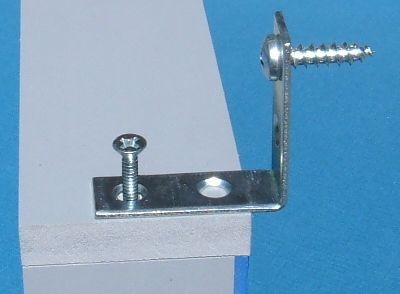
Setup for wall mounting
Another consideration is daytime visibility, where the unit should be located as close to the street as possible. Some houses lead with the garage, some with the front porch. The available angle of viewing is also a factor if shrubbery or other structures interfere with the street view.
The displays are easily night-readable from 80 feet; reading will become difficult at over 100 feet, although the display will attract attention from twice that far away.
If the house is distant from the street, consider putting the LEDress on a post, fence, or other existing structure and run wires to it underground in a small PVC pipe.
The photocell is on the bottom of horizontal units (and on the side of vertical units). The cell is plainly visible through a little window, and should be given a clearance of at least one inch from the nearest surface for the display options to work properly.
Setup for wall hanging
The screw head fits through the brace hole
This method "hides" the mounting braces
The LEDress does not have to be mounted outside! The enclosure may be thin enough to be mounted in a window frame inside the house. If there is an electrical outlet within 5 feet of the mounting site, that is even simpler; then the transformer wire may not have to be extended. See the wiring link for more information.
Once the unit is mounted, the screws into the house structure may be loosened slightly to allow for some downward tilt of the display. The sketch shows this in an exaggerated manner. The idea is to make the display face directly at someone in the street or sidewalk so that the entire graphic number or lighted digit is visible. This is more important when property slopes up from the roadway, or the house set-back is short, creating a steep upward view of the mounting location. The tilting also helps to remove bright sky reflections that make daytime reading more difficult.
When mounting under an eave, the closer the unit is placed to the gutter edge of the eave, the better the daytime display reading will be, since the LEDress will not be in so deep a shadow.


